Saturday, May 11, 2013

Civil War Repro

I am so proud to announce that I am now a member of the American Quilt Study Group!!! I have now decided that I want to be and will be a quilt historian. It will take time to learn, but I am so ready for this challenge!!!
Our mission statement is as follows:
 
"The American Quilt Study Group establishes, sustains, and promotes the highest standards for quilt-related studies. We stimulate, nurture, and affirm engagement in quilt studies and provide opportunities for its dissemination."

I am such a lucky girl.


So, I have been interested in Civil War history since I was small thanks to my father. After extensive research he found out that one of our ancestors was in the Confederate Army (more to come on that later).
 As my father delved further into this research it fascinated me and I wanted to know more. So, off and on for years I studied Civil War culture. Why would a free country separate and fight each other? We all know the basics, but it all came down to our rights. We are lucky now to not have to worry about our country fighting against each other, now when something bad happens we all seem to stick together. 
This is why I love my country so much!


So, a few months back I started to remake Dear Jane. If you do not know the quilt you can see it here. The Dear Jane quilt was made by Jane A Stickle "In War Time" in the 1860's. The quilt itself has 225 blocks, most of which are 4 1/2". It's been a challenge, but sew much fun!


I now have started the Dixie Diary Quilt by  Barbara Brackman. This is a BOM and started in January, but I started a little late. With each tutorial Barbara gives you the story with the block. It is so fascinating! It also brings us back to traditional quilting. Were, I believe, every quilter should start if we really want to understand quilting. This is something I am super serious about because we need to learn from our quilting fore-mothers.

The first block for the Dixie Diary BOM is "Her Flying Flag" and it is beautiful! The story is even more amazing, check it out here.

And, here is my version:


So now on with my journey. I do hope you follow along with me......


Sunday, April 21, 2013

Flax & Lavender Flower Eye PIllow Tutorial

Flax & Lavender Eye Pillow Tutorial

Hi all!! Welcome to one of my first real Tutorials!! Yea!!

Have you ever had one of those crazy nights while your trying really hard to go to sleep but you can't because there is too much going through you mind and you just can't seem to relax? 
I have them a lot (mostly because I am thinknig about fabric ;), so I found out that a great way to help you relax and de-stress and to drift away into a dreamy state of awesomeness...  The flax has amazing qualities also, it can hold heat and cold for longer periods of time and the pressure of the flax lays right on your sensory points!


Flax & Lavender Flower Eye Pillow!!!! 


I have been making these for a couple of years now and my biggest supporters are the yoga community. These work great for meditation also.
They can also be used hot or cold,( 45 seconds in the microwave or put in a ziplock bag in the freezer)  and great for headaches & migraines!

So, lets get started. 

First off your materials:
Fabric: 2 coordinating fabrics
 ( I prefer using 100% cotton, because I am a quilter and I have a little stash, ok a huge stash. You can also use satin)
Thread: 100% cotton, solid color or verigated
Machine feet: 1/4" foot & an open toe decorative foot
Filling: Flax seed (it's hard to say how much so start with a lb)
Lavender Flower
Lavender oil
You will also need a bowl, a spoon, and I use a 1/4 cup measuring cup as well.

 
  Step 1:  Take your fabrics and cut 1 each 4 1/2" x 11"


Step 2: Next, Iron a 1/2" flap over to the wrong side of the fabric on both pieces.


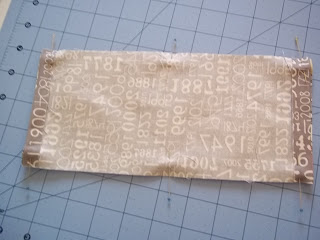
Step 3: Take your two rectangles and place them right sides together and pin. 


Step 4: Using you 1/4" foot stitch down both long ends making sure you back-stitch on both ends.
**Leave opening a the top and bottom.
I also used me straight stitch plate so the fabric would not get sucked down into the machine, another quilters tip..... 

Back-stiching....


Step 5: Next take it to your iron and press to set the seams, this helps "set" the threads into the fabric.
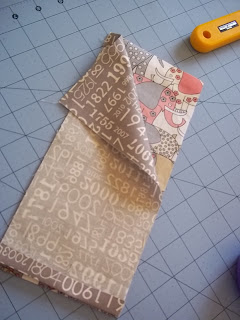
 Next turn inside out.
And press the pillow flat making sure to "smoosh" the seams flat.


Now to mix your filling:


Step 6: Take your flax and lavender flower and place into a large bowl or a plastic bin that has a top, if you make a large batch you can save this for later use.

Next, mix together and add 5-10 drops of lavender oil and mix again.
You can always add more lavender flower if you want a more relaxing scent.


Step 7: Switch to your open toe decorative foot ( if you have a straight stitch plate on now is the time to switch it to your open mm stitch plate or you will break a needle.)


Now choose a decorative stitch, I used a leaf stitch, and stitch one of the ends closed. Make sure to do a small back-stitch at both ends.
This is where you can use a variegated thread, it makes it more fancy...ooohh....


Step 8: Now take your pillow over to your mixture and star filling until about 3/4 full.


Step 9: Take two large safety pins and pin through both layers. This will ensure that the mixture does not spill out while you are stitching the opening closed.

 Now stitch the second opening closed using the same decorative stitch.


Viola!!! You have an awesome eye pillow!

These can also be used for sore muscles as well, just heat up in the microwave and place on the sore area and you can feel the pain melt away.....

Thank you so much for stopping by and any comments will be greatly appreciated!

~Namaste
Anna V


The purpose of our lives is to be happy. 
~Dali Lama


Tuesday, April 16, 2013

Libby Lehman is coming to Sarasota!!!!! Yea!!


We are so excited that Libby will be joining us down here in Sunny Florida May 10-11!
Libby will be teaching ThreadPlay & Sheer Delights!
Libby is an accomplished studio art quilter. If you have never seen any of her quilts you need to go here. She is such a talented quilter!! We cannot wait to host her at Say It With Stitches!!!

Libby began her quilt journey 40 years ago when her mother, Catherine Anthony, signed her up for a basic quilting class. Well, like most of us she was hooked! Since then she has evolved from a traditional hand-quilter to one of the leaders in innovating machine stitching.
Libby has won several awards and her collections are widely sought after.


Have you ever heard of Thread Play????
Well, Libby is the author of ThreadPlay With Libby Lehman.
In ThreadPlay, Libby shows you how to create ribbon illusions & sheer stitching, thread painting, bobbin drawing, & couching.
Its a great way to learn freemotion quilting, or to just freshin' up your skills!


If you happen to be in the area on May 10-11 you should totally come to this event!

For more info call:
Say It With Stitches
941-925-3855

You guys have a wonderful day!!!!

Monday, February 4, 2013

Black In Black! I mean Pink....

So, I have been gone from the blogging world for a long time, but realized I wanted to come back. So, here I am!!

A lot has happened since I last posted, with the holidays and normal everyday life I drifted away from blogging but not sewing.

I want to share what I have been up to these last few months.
So, here we go.......

1)First and foremost, the job change...

I am now working with an amazing crew and owner of an embroidery/dealer of top end sewing machine shop!
I absolutely love it!  
 Ready for a photo bomb.....
  No egos were harmed in taking this picture.....
Yes, that is myself and my boss, Ann, photo bombing a sewing class at the shop.... We don't work, we play. 

2) A new Ironing station, Yea!!

I begged my husband, Jason, to make me a ironing station to make life easier on me....


 It began with and industrial shelving unit, then some gorgeous pieces of fabric, and then on the top shelf we put down a layer of Insulbrite, a layer of silver ironing fabric, and lastly a layer of Tula Pink Salt Walter fabric in blue. Sew pretty! The shelf is 18"x36", perfect for pressing large pieces. Lots of storage too! 
I have to admit that I filled up 21 clear boxes of fabric, it still wasn't enough.

3) Sewing, Sewing, Sewing.... sigh....

I am so guilty of starting new project in the middle of other projects. I literally have four projects going all at the same time. Yes, I am ADD. I can't help myself!!

 These blocks were made for the do.good.stitches,a chrity bee.I am in the Faith group with a wonderful group of talented quilters. I'm a lucky girl.
 For Christmas I was given a beautiful charm pack from my awesome Niece, Micah. The color were amazing! But, we all know I had to throw some pink in there. I call this Micah's Day. So sweet.
 I love this one! I have been slowly but surley working on my Vintage 9 Patch by Jeni at In Color Order. I love how tacky this one is coming out. The entire quilt has eighty something blocks. Can't wait until it's finished!!

 OK, so I have an obsession with my Rowenta Iron, Wennie. Yes, she has a name. She goes to work with me everyday. I am that crazy lady that carries an iron around, there I admitted it, I feel better. Well, Wennie had to have her own special carrier. When a local quilt shop offered a class to make an iron caddy, I was on it like a June bug on a fence post. I used Tula Pink's Pince Charming, and it is charming.
   
Last but not least, the same shop offered this beautiful spiral table runner class. I just had to take it. The fabric is by Dear Stella. It's way prettier in real life.


Ok, what number am I on.......oh yes ...

4) Last but not least,I have decided to do the unthinkable....
No screaming please...


I started with some of the "easiest" Blocks....


A-6 Uncle Homer

 
 C-1 Trooper Green's Badge
 D-13 Field of Dreams

 
  D-6 Challenge


I will be teaching this class very soon, so I am trying to get as many of the 225 blocks as I can. I only changed one thing though, the original blocks are 4 1/2" square. I will be doing a mix of 6" and 4 1/2" squares.

Well, that's enough of my sewing escapades...
What are you working on right now?


One more thing,
 
All this work has made Yoshi exhausted...

~Namaste